Archive | April, 2012

Grown-Up Mac and Cheese

29 Apr

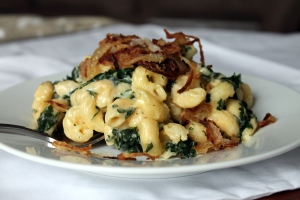
As with take-out pizza versus homemade, there is also a time and a place for boxed mac and cheese and a time for homemade.  Is it bad to admit that I still enjoy the blue box variety?  I feel like that’s ok, since I appreciate the blue box kind for completely different reasons than a gourmet homemade version (namely nostalgia and the freedom to douse it in ketchup – which is probably gross to many people – oops).   Today’s recipe is for a “grown up” mac and cheese (with spinach and crispy fried shallots on top) – but really it’s just for a homemade variety – since the recipe is completely adaptable for all tastes and ages.

Once you know the basic process for making macaroni and cheese, the possibilities are endless.  This is a more classic version of macaroni and cheese, with cheddar and Gruyère (with spinach added to make me feel slightly less guilty about this indulgent dinner – and really, the cheese and pasta mellow out the spinachy taste – amen).  The crispy shallots (which to me are a more gourmet spin on French’s fried onions) add a lovely salty and tangy bite – don’t skip them – they really add that extra something.  But, like I said before, the possibilities are endless – you can use any combination of cheeses and/or veggies and/or meat you want (or use no veggies or meat at all!).  One of my personal favorites is using Pepper Jack cheese and tiny broccoli florets for a so-called “Mac and Jack” spicy macaroni and cheese.  Yum.

This is a quick version of macaroni and cheese, which skips any baking in the oven.  But you can certainly pour the macaroni into a baking dish, top with bread crumbs and/or cheese (and/or crispy shallots!) and bake until golden brown.  I can’t decide which method I like better – without baking, the sauce stays so luxuriously creamy and saucy; but when baked, the crunchy golden brown top is pretty delicious too.  I’m torn.

Mac and Cheese with Spinach and Crispy Shallots

Time: 25 minutes; Yield: 8 servings

  • 3 tablespoons butter
  • 3 tablespoons all-purpose flour
  • 4 cups whole milk
  • 3 cups shredded cheese (I recommend a mix of aged sharp cheddar, Gruyère and/or Jack)
  • 1 teaspoon Dijon mustard
  • 1/2 teaspoon Old Bay Seasoning
  • Few grates of fresh nutmeg
  • 8 ounces fresh spinach, chopped finely (optional)
  • 1 pound cavatappi (hollow corkscrew shaped pasta), or any other noodle you like
  • 2 large shallots, thinly sliced
  • Flour, to coat shallots
  • 4 tablespoons olive oil, or enough to generously coat a saute pan
  • Salt and pepper

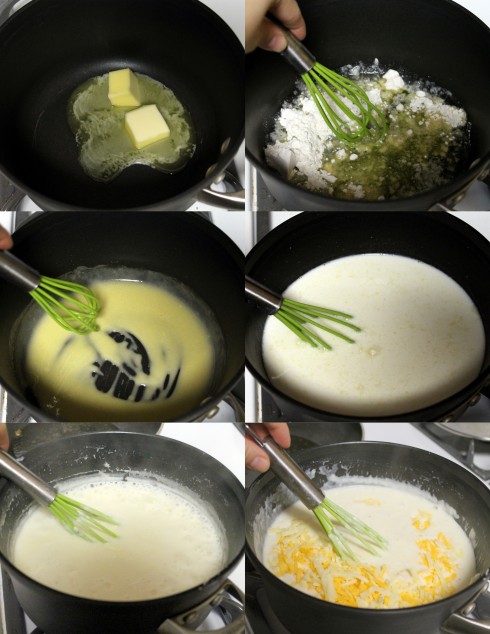
Making the Sauce: Melt the butter in a medium saucepan over medium heat, then whisk in the flour.  Cook for about 2 minutes, then add milk.  Bring to a boil (~8 min), then reduce to a simmer for 10-15 minutes or until thickened, whisking often to prevent burning.  Season with salt and pepper.  Once thickened, add the cheeses, mustard, Old Bay and nutmeg, whisking to combine.

Cooking Pasta and Spinach:  Boil pasta according to package directions.  When the pasta is ready, add the chopped spinach to the boiling water to blanch, then drain both the pasta and spinach (ensuring to get as much water out of the spinach as possible).

Crispy Shallots (aka grown up French’s fried onions):  While sauce and pasta are cooking, toss the thinly sliced shallots with enough flour to coat.  Heat olive oil in a saute pan over medium-high heat, add shallots, and cook until crispy and golden brown.  Remove to a paper-towel lined plate to drain excess oil.

Assembly:  When sauce is finished and pasta and spinach are cooked, pour sauce on top of pasta and spinach and toss to coat.  Don’t add all the sauce all at once, in case it’s too much (wait, is that possible?!).  Top with crispy fried shallots and serve immediately.

Isn’t it surprisingly easy to make homemade mac and cheese?  I think so :)  What other flavor combinations do you think would be good?  I’m thinking anything with bacon would be pretty amazing, but maybe that’s just me….

Caramelized Onion, Bacon and Goat Cheese Pizza

22 Apr

Before a few years ago, I had never really made homemade pizza.  Growing up, pizza was always ordered in, we never made it ourselves.  There is certainly a time and place for take-out pizza, and to me, it’s totally different from homemade.  But homemade pizza has its time and place too – and it’s less expensive and you can have much more creative liberty with it than takeout.

There are a lot of options in the store these days for pizza dough at home.  Dry mixes (like Betty Crocker), refrigerated vacuum-packed (like Pillsbury), pre-baked crusts (like Boboli), or store-made fresh dough (often found near the deli/refrigerated section).  I’m sure I’m missing some options, but as you can see, the possibilities are endless.

I personally tend to resort to using the store-made doughs or making my own.  I’m not a huge fan of pre-baked crusts like Boboli, but I do like using store-bought Naan as a crust sometimes.  Generally, I usually like to use whole wheat dough, which I can usually find available in the store-made dough selection.  Sometimes it’s not available though, so making my own  is the best option.  This also ensures that I know what’s in the crust, and it allows me to customize the flavor a little more too.  It does obviously take a little more time, but not much.  Making pizza dough is simple, but it certainly feels impressive, so I’d definitely encourage you to try it (just like making homemade pasta – but this is actually even easier than that!).

I think one of the other reasons I hadn’t made homemade pizza before a few years ago was that I didn’t know what sort of pan to use to bake a pizza at home.  Then, one of my aunts bought me a pizza stone, like this,  as a birthday present, and that changed everything :).  But, you can also use a pizza pan like this or like this.  If all else fails, you can use a heavy-duty cookie sheet.  There are a few things to remember when using a pizza stone, so make sure to read the directions (For example, you have to put the stone in a cold oven, then turn it on to preheat so the stone doesn’t crack.  Also, you can’t use soap to wash it, and depending on your stone, you may or may not be able to use a pizza cutter directly on the stone).

The pizza dough recipe below could be used to make any pizza you want – I just happened to feel like caramelized onions, bacon and goat cheese :).  I used the caramelized onions essentially as the sauce, but you could just as easily use a store-bought tomato pizza sauce and layer on any other toppings you want.  This dough recipe is for a Thin, Whole Wheat Crust.  The mixture of white and wheat flours gives a better flavor and texture than using all whole wheat flour.  This recipe yields enough dough for one large pizza, with a thin to medium crust, or, two small/medium pizzas with thinner crust.  The thickness will depend on how thin you roll the dough.

White/Wheat Pizza Dough

(I use half whole wheat and half white flour, but you could use all white or all wheat, though it will change the texture)

Time: 25 active, 30 inactive  Yield: 1 large or 2 medium/small pizzas

  • 1.5 cups all-purpose flour
  • 1 cup whole wheat flour
  • 1/4 ounce active dry yeast (found in the baking aisle)
  • 1 tablespoon sugar, divided
  • 1 cup warm water (not hot – this could kill the yeast)
  • 1 tablespoon olive oil
  • 1/4 teaspoon salt
  • 1 teaspoon garlic powder, optional
  • 1 teaspoon dried basil, optional
  • Cornmeal, for coating pizza stone to prevent sticking

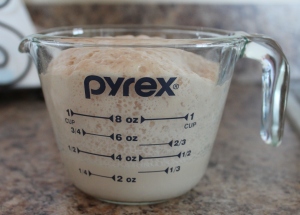
Add half the tablespoon of sugar to the warm water and dissolve.  Sprinkle the yeast on top.  After about 10 minutes, it should be all foamy – this is how you know the yeast is now active:

Meanwhile, combine the flour, salt, other half tablespoon of sugar, spices and olive oil in a large bowl (preferably of an electric mixer with dough hook attachment.  If you do not have one, this can be done in a regular bowl with a spoon, and can be kneaded by hand).  Add the yeast/water mixture and stir with dough hook/spoon until moistened and combined.

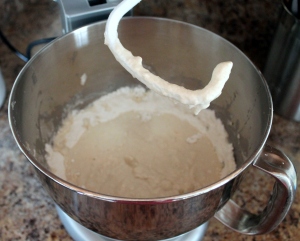
Continue to knead, either by hand or with a dough hook, for 6-8 minutes until the dough is smooth and elastic.  If too sticky, add more flour (a tablespoon at a time); if too dry, add water.  The dough should be moist but not sticky.  Below you can see the elasticity of the dough – keep kneading until it holds its shape as a nice ball.

Place the dough on a lightly floured counter and allow to rest for 20-30 minutes, covered with a damp towel.

Meanwhile, place your pizza stone in the oven and preheat the oven to 425°F.  Alternatively, lightly grease a 12″ metal pizza pan.

Once the dough has rested, gently roll/pat/stretch the dough out to the size you need.  When using a pre-heated pizza stone, I normally try to stretch out the dough as much as possible, then I take the stone out of the oven, sprinkle with cornmeal, then as swiftly as possible, place the dough on the stone and add the toppings.  Then I return it to the oven, usually 12-15 minutes, depending on the toppings.

Caramelized Onion, Bacon and Goat Cheese Pizza

Time: 20 active, 35 inactive Yield: One 14″ pizza

  • 2 medium yellow onions, thinly sliced
  • 1/2 tablespoon butter
  • 1 tablespoon extra virgin olive oil
  • 1/4 cup white wine
  • 1 teaspoon tomato paste, optional
  • salt and pepper
  • 3 ounces goat cheese, crumbled
  • 1/2 cup mozzarella cheese
  • 6 slices bacon, cooked and cut into 1/2 inch pieces
  • Fresh basil, julienned
  • Olive oil, dried oregano and pepper for seasoning before serving

Preheat the oven (and pizza stone) at 425°F.

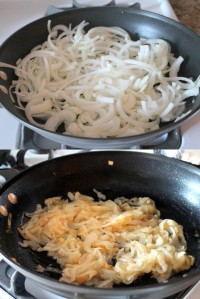
Over medium heat, heat the butter and olive oil in a saute pan and add onions.  Season with salt and pepper, and cook, until caramelized 15-20 minutes (low and slow is the best way for caramelized onions – you want them to become translucent, then gradually get golden brown, without actually browning or burning them).  Once caramelized, add white wine and tomato paste and cook until wine is evaporated.

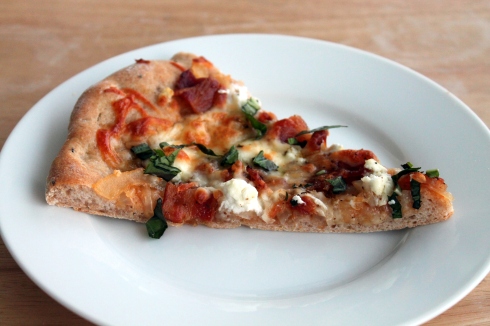
See above recipe for dough or use store-bought.  Stretch to fit pizza stone or pan (as directed above).  Except try to make it prettier than mine.  I was being a little too hasty and not gentle enough, so I got a few wholes in my dough.  Be gentle and patient, unlike me.  Spread with caramelized onions, then sprinkle on goat cheese, bacon and mozzarella.

Bake for 12-14 minutes, or until cheese is melted and crust is golden brown. Remove from the oven and sprinkle with fresh basil, dried oregano, pepper and a drizzle of olive oil.

Slice (preferably on a cutting board), and serve immediately.

Mmmmm bacon and goat cheese.  Doesn’t get much better than that…even if the dough doesn’t look pretty, it will taste delicious, I promise.

So who’s feeling like pizza?  Was that a clear dough tutorial, or did I miss something?  Let me know if you have any questions and I will do my best to answer them in the Comments Section.

Recipe Review + An Easy Way to Cook Fish

12 Apr

Lately I haven’t had much time to come up with too many original recipes, plus I have been finding so many recipes I want to try in magazines and on Pinterest.  So I was thinking, I’d start a new sort of post here – Recipe Reviews.   I will post the recipe, a brief review of it, plus pictures of my adventures making it.  Then, like today, I’ll try to post suggestions or alterations that are possible from the recipe.

I have been meaning to write a post about easy ways to prepare fish for a while now, so the recipe for today just happened to be good timing.  The original recipe is from Everyday Food magazine  one of my personal favorites.  I always find the recipes in that magazine simple to prepare, yet flavorful and satisfying.  This recipe was no exception – with only 5 real ingredients – yet it was wonderfully flavorful (and super healthy!).  And, cooking fish in parchment paper or foil is one of my favorite techniques.  It steams the fish (and anything else you include in the foil or parchment packet, like vegetables), so it can be a really healthy way to prepare a meal relatively quickly.  I’ve shown below that I used parchment paper and foil and both worked equally as well.  I actually slightly prefer foil because 1) it’s easier to open and reclose to check if the fish is done and 2) it’s cheaper (ha – I really am frugal).

Here is the recipe, along with some additional instructions and pictures.  Below the recipe I’ve listed a few more ideas for different variations on this recipe (there must be an infinite number of combinations of fish and vegetables – so have fun with it!).

Ginger Orange Salmon in Parchment adapted slightly from Everyday Food Magazine (April 2012)

Yield: 2 servings; Time: 20 active + 20 inactive

  • 6 ounces baby spinach
  • 1 tablespoon orange zest
  • 2 medium oranges, peeled and cut into rounds*
  • 2 salmon fillets
  • 1″ piece fresh ginger, peeled and cut into thin match sticks
  • 1 shallot, thinly sliced
  • Salt and pepper
  • 1 tablespoon extra virgin olive oil

Preheat the oven to 400 degrees.  On two 16″ long piece of foil or parchment paper, place the spinach, followed by the salmon, orange zest, slices, ginger and shallots.  Season all with salt and pepper and drizzle with olive oil.

Form packets: fold the long ends of the foil/parchment together and make a seem, then tuck the ends underneath to secure (technique is not as crucial as making sure they are tightly closed so the steam stays contained in the packet).

Place packets on a rimmed baking sheet and bake 15-20 minutes.

Parchment or foil – either one works!

When nearing the end of cooking time, open the packets and check to see if the salmon is cooked through, resealing and returning to the oven for a minute or two if it needs more time.  Serve immediately.

*How to peel and segment or slice oranges:

Slice off both ends of the fruit.

Then, using a sharp knife, progressively cut thin strips of skin off, taking care to remove as little of the fruit as possible:

Then, you can either slice it into rounds, or individually cut each section out from the pith.


Variations to Try:

Whether you use parchment paper or aluminum foil, the possibilities are endless for this basic recipe.  You can get by with using very little fat, but the more butter or oil you use, the more delicious the results ;-).  I especially like using compound butters (softened butter mixed with any variety of herbs, garlic and seasoning you want).  Make sure to include enough citrus slices or vegetables to provide moisture to help the fish steam, to ensure a moist result.

The type of fish you use can also be changed easily too.  Depending on the thickness and how delicate the fish is, I would recommend trying out oven temperatures between 375 and 400 degrees, with cook times between 12 and 20 minutes.  This will also depend on how much other “stuff” you include in the packets.

  • Salmon with lemon/dill butter plus julienned yellow squash and finely diced tomatoes
  • Tilapia (or sole or flounder or halibut) with lemon slices, lemon juice, butter, garlic and asparagus
  • Salmon with thinly sliced fennel or leeks, plus a little white wine, herbs and butter
  • Halibut (or other white fish) with sliced baby bok choy and carrots, with ginger, garlic, soy sauce and sesame oil

Crepes!

2 Apr

Ah, crepes.  So simple, yet so delicious.  Yes, I said simple! 

Rarely have I ever made pancakes from scratch (i.e. not a box mix), but I’ve made crepes from scratch numerous times.  Surprisingly, the batter could not be simpler or easier to make.  You just throw all the ingredients in a blender and you’re done!  Then, the amount of topping/filling combinations you can make are endless.

Today I want to share with you the basic recipe I use, plus two ideas for savory crepes (Rolled crepes with mushrooms, spinach and Brie and ham-and-egg crepe squares). They make a perfect breakfast, lunch or dinner.  And of course, the amount of sweet variations you could make using this base recipe is also endless – I would recommend Nutella + bananas or strawberries, powdered sugar + any fruit, especially blueberries or raspberries, or even a sweet and savory combo, like Brie with strawberries.  MMM. I LOVE CREPES.

My go-to crepe recipe is Alton Brown’s.  It’s worked flawlessly every time I’ve made crepes.  This time, I made a few slight changes, which I mention below.   After you make the batter, the recipe calls for a “resting” time, where you chill the batter in the refrigerator for 1 hour (or up to 48).  This may seem unimportant, but it really does make a difference in how easily the crepes tear.  So make sure to plan ahead and refrigerate (I speak from experience).  I like that you can really make this batter way ahead of time – up to 48 hours – and then have it on hand any time you want some fresh crepes.

Basic Crepe Recipe, slightly modified from Alton Brown’s original recipe

Time: 5 min prep, 1 hour chill, 20 min cooking; Yield: 17-22 crepes

  • 2 eggs
  • 3/4 cup milk
  • 1/2 cup water
  • 1/2 cup flour
  • 1/2 cup whole wheat flour (optional modification – you can use all white flour if preferred)
  • 1 large pinch sugar
  • 1 pinch salt
  • 3 tablespoons butter, melted, plus more for coating pan

Combine all ingredients in a blender and pulse for 10 seconds. 

Chill in the refrigerator at least 1 hour, or up to 48 hours.

*If making sweet crepes, add 2 more tablespoons sugar to batter.

How To Make Crepes:

You don’t need a fancy crepe pan to make crepes, but you can use one if you want to.  I have one from a long, long time ago, just like this crepe pan.  It’s really just a simple pan with low sides, which makes it easier to get your crepe spatula underneath the crepe to flip it.  A normal ~8″ fry pan and spatula will work just fine though.  Last time I made them, I made them double time – using one crepe pan and one normal pan, and they came out equally well.  But if you want to be fancy, invest in the pan and the spatula.  If you’re going to pick one, pick the spatula – it’s wooden, so it won’t scratch your non-stick pans, plus it’s the perfect shape for gently sliding under the crepe and flipping it.

Anyway, to make a crepe, heat your pan over medium-low heat, and add a small amount of butter to coat the pan. 

Pour in 1/8 to 1/4 cup batter into the pan, lifting and swirling the pan to help the batter form a thin layer which covers the whole pan. 

Cook for 30 seconds, then carefully slip spatula under the crepe and flip. 

Cook for another 1o-20 seconds, then remove from the pan.  Serve immediately, or allow to cool separately, then stack and refrigerate for later use.

Fill with one of the following suggestions, or your own creation!

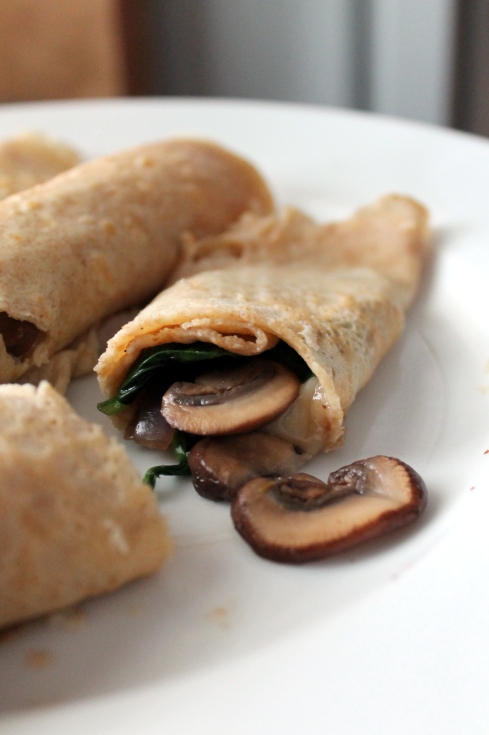
Spinach, Mushroom and Brie Rolled Crepes

  • 1 tablespoon butter
  • 8 ounces baby bella mushrooms, cleaned and sliced (or any other variety you like)
  • 1/4 cup red onion, thinly sliced
  • 2 cups fresh baby spinach
  • 2 tablespoons cooking Sherry (or white wine), optional
  • 1/4 teaspoon dried thyme
  • Salt and pepper
  • 4 ounces Brie, rind removed, cut into pieces
  • 6 crepes

Melt butter in a saute pan over medium heat.  Add the mushrooms and onions and cook until tender.  Add in thyme and season with salt and pepper. 

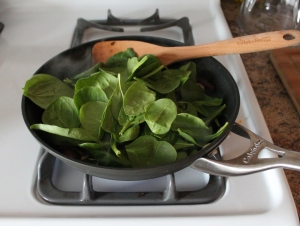
Add the Sherry and cook until mostly evaporated.  Add the spinach in the pan and wilt. 

Meanwhile, place pieces of Brie down the center of 6 crepes.  Once spinach is wilted, spoon hot spinach and mushroom mixture over top of Brie. 

Roll up crepes and serve.


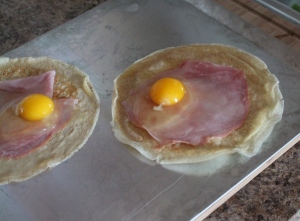
Ham and Egg Crepe Squares

  • 4 slices ham
  • 4 eggs
  • 4 crepes
  • Salt and pepper
  • Shredded cheddar cheese, optional

Preheat oven to 350°F.  Lay crepes flat on baking sheet sprayed with cooking spray.  Place one piece of ham on each crepe, then crack an egg over top.

Fold up sides of crepe to form a square.

Season with salt and pepper and sprinkle with cheese.  Bake 10-14 minutes until white of egg is set and yolk is your desired doneness. 

Enjoy!